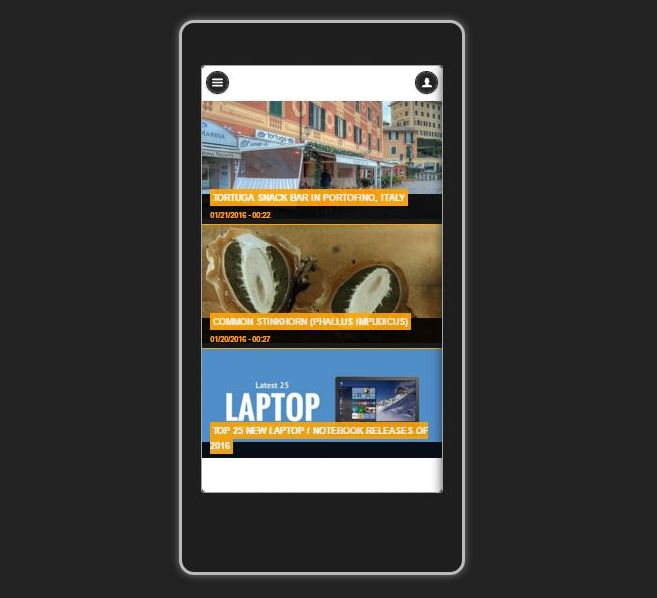
There was a time when I was really eager to develop native Drupal app, back then I decided to stick with Drupalgap. Now, more than a year has already passed since, and I haven't achieved my goal (s) yet.
Until recently, I decided to finish works on native Drupal app I started back in 2014. Speaking of my app - nothing fancy here, just my latest blog posts, with ability latter to extend functionality adding more native app features (geo location, for example) . As I like to call it - minimum viable product approach.
I installed DrupalGap module and all its dependencies on my site, I must admit I had some problems actually getting it alive, but they were more server related rather problems with module itself. In short I experienced problems with server permissions to upload files, so I had to install DrupalGap library manually (instead of a one click installation), and then turned out that DrupalGap is not very friendly with php 5.2. version, so I had to patch it a little bit.
Ok, when I was setup and mobile-application folder was created on my server, I straight went to explore how to get a front page for my app listing latest articles with images and date, and here is how I achieved it:
Custom front page for Native Drupal app using DrupalGap
For most of the documentation I followed on DrupalGap Docs. Almost all from written bellow is taken from DrupalGap documentation: Article Titles with Images and Image Lists. I modified a little bit views and .js file to achieve results I was looking for. It took me several hours to get this done, and hopefully I can spare you some time. For previewing my app online I installed Ripple Emulator (Google Chrome Extension) and disabled Cross Domain Proxy

App preview on Google Chrome Ripple Emulator
Creating Json Views for DrupalGap
- Create a new view - Article Images
- Set view to Json data document
- Add fields: title, images, nid and post date
Preview your view:
{
  "nodes" : [
    {
      "node" : {
        "title" : "Tortuga Snack Bar in Portofino, Italy",
        "field_images" : {
          "src" : "http://www.reinisfischer.com/sites/default/files/styles/front/public/tortuga.jpg?itok=dgcNmioC",
          "alt" : ""
        },
        "nid" : "4407",
        "date" : "01/21/2016 - 00:22"
      }
    },
Next create a new custom module in your DrupalGap folder: (How to create custom module in DrupalGap)
- In /app/modules/custom (you will have to create those directories as well) I created a new folder - front, in which I created new .js file front.js.
/**
 * Implements hook_menu().
 */
function front_menu() {
    try {
      var items = {};
            items['front'] = {
              title: 'Article Images',
              page_callback: 'front_article_images'
            };

      return items;
    }
    catch (error) { console.log('hook_menu failed - ' + error); }
}

/**
 * The page callback to display the view my_module_article_images.
 */
function front_article_images() {
  try {
    var content = {};

    content['my_articles_list'] = {
      theme: 'view',
      format: 'none',
      path: 'article-images', /* the path to the view in Drupal */
      row_callback: 'front_article_images_list_row',
      empty_callback: 'front_article_images_list_empty',
      attributes: {
        id: 'article_listing_items'
      }
    };

        return content;
  }
  catch (error) { console.log('front_article_images - ' + error); }
}

/**
 * The row callback to render a single row.
 */
function front_article_images_list_row(view, row) {
  try {

      var image_html = theme('image', { path: row.field_images.src });
      var title_html = '<div class="mobile-title"><div class="inside"><h2><span>' + row.title + '</span></h2></div></div>';
      var date_html = '<div class="mobile-date">' + row.date + '</div>';
      var link = l('<div class="mobile-wrap">' + image_html + title_html + date_html, 'node/' + row.nid) +'</div>';
      return link;

  }
  catch (error) { console.log('front_article_images_list_row - ' + error); }
}

/**
 * Callback function for no results.
 */
function front_article_images_list_empty(view) {
  try {
    return '<p>Sorry, no articles were found.</p>';
  }
  catch (error) { console.log('front_article_images_list_empty - ' + error); }
}
What I did in this file:
First - I setup display format to none, so I can apply my own custom CSS, instead of using ul li elements, then I added date field and finally applied some custom CSS classes for wrapping results page, here are the CSS styles for them, I added them to drupalgap.css file (but you should probably add them to your theme css file). N.B. CSS styles in this example are not perfect, you should use them just as a reference.
.mobile-title{
    position:absolute;
    bottom:0px;
    left:0px;
    background:black;
    width:100%;
    height:40px;
    filter: alpha(opacity=90);
  /* IE */
  -moz-opacity: 0.9;
  /* Mozilla */
  opacity: 0.9;
}
.inside{
    position:absolute;
    bottom:25px;
    left:10px;
}
.mobile-title h2{
    line-height: 12px;
    font-size: 12px;
    display: inline;
}
.mobile-title h2 span {
padding: 0.4em;
 background-color:orange;
 }
.mobile-wrap a{
    color: #ffffff!important;
    border-color: #bbb;
    text-shadow:none!important;
    text-transform:uppercase;
}
.mobile-date{
color:orange;
font-size:10px;
position:absolute;
bottom:5px;
left:10px;
}
Make changes in settings.js file
- Add Drupal.modules.custom['front'] = {};
- Change front page drupalgap.settings.front = 'front';
What's next?
I hope this is a good starting point if you are struggling finding out how to theme your custom frontpage in DrupalGap. Speaking of me - I will fine tune this app to make it look better, and hopefully will move to the stage two - actually finishing it and publishing online. I will keep you updated.