While working on my latest short documentary about our travels in India, I ran into a frustrating issue: after exporting the final video, it was completely overexposed and unwatchable. The scene of us visiting the Taj Mahal was adorable—except the Taj Mahal itself was barely visible, washed out in a sea of bright white.
After spending hours trying to figure out what went wrong, I finally stumbled upon a surprisingly simple solution.
The footage was shot using an iPhone and a DJI Mavic Air drone in 4K
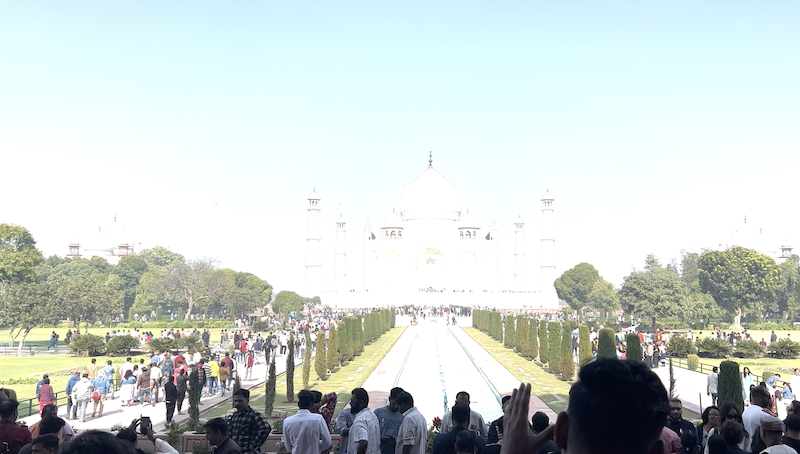
Taj Mahal scene after default export
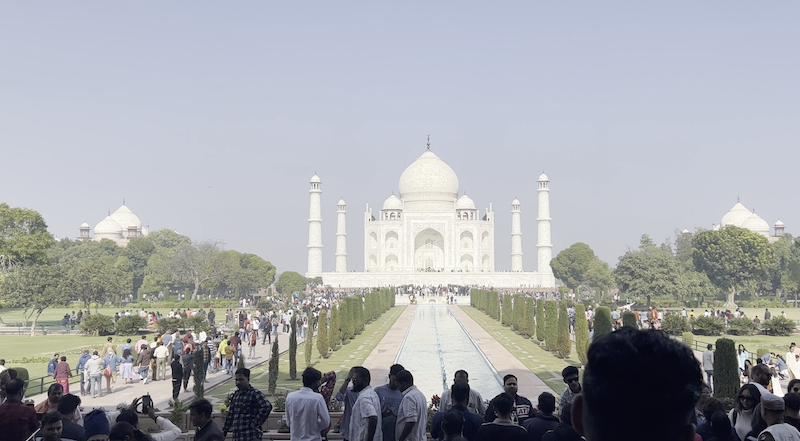
Taj Mahal scene fixed
Solution:
Turns out it has somehow related to shooting in HDR format, you can individually adjust settings for scenes from the bin in the left by right-click > Modify > Interpret footage
As I was working with a large about 25 minutes movie with hundreds of scenes, I copied all the scenes from the sequence (CMD+A -> CMD + C) to the new sequence (CMD + V), making sure that the settings for new sequence are enabled for Rec.709 (and not Rec.200)
On mac for export you can use CMD+M to compare actual footage with export
Longer version:
This is a common problem, often tied to color space mismatches or export settings, especially with footage from modern devices like iPhones or cameras shooting in HDR (e.g., HLG or Rec. 2100). Here’s a step-by-step guide to fix it:
1. Check Color Space Compatibility
- Why It Happens: If your footage is shot in an HDR color space (like Rec. 2100 HLG or BT.2020), Premiere Pro might misinterpret it in an SDR (Rec. 709) sequence, or the export settings might not match the source, causing overexposure.
- Fix It:
- In the Project Panel, right-click your clip and select Modify > Interpret Footage.
- Under Color Management, set the Color Space Override to Rec. 709 (if your export is SDR) or match your intended output (e.g., Rec. 2100 HLG for HDR).
- Go to Sequence > Sequence Settings and ensure the Working Color Space matches your footage or desired output (e.g., Rec. 709 for SDR or Rec. 2100 HLG for HDR).
2. Adjust Export Settings
- Why It Happens: Exporting with mismatched color settings (e.g., HDR footage in an SDR preset) can blow out highlights.
- Fix It:
- Go to File > Export > Media.
- In the Export Settings window, under the Video tab, scroll to Encoding Settings.
- Set Export Color Space to match your sequence (e.g., Rec. 709 for SDR or Rec. 2100 HLG for HDR).
- If using H.264 or HEVC, avoid default presets like “YouTube 1080p” unless you tweak them. Instead, use Match Source and adjust manually if needed.
- Check Render at Maximum Depth and Use Maximum Render Quality for better color fidelity.
3. Use SDR Conform (For HDR Footage in SDR Projects)
- Why It Happens: HDR footage in an SDR timeline can look fine in Premiere but overexpose on export if not converted properly.
- Fix It:
- Select your clip in the timeline.
- Go to the Effects Panel (Window > Effects), search for SDR Conform, and apply it to the clip.
- In the Effect Controls Panel, adjust the Luminance Mapping to tame highlights (start with defaults and tweak as needed).
4. Test with a Different Media Player
- Why It Happens: Some players (e.g., Windows Photos) mishandle color profiles, making exports look overexposed even if they’re correct.
- Fix It: Re-import the exported file into Premiere Pro or play it in a reliable player like VLC to confirm the issue isn’t player-related.
5. Pre-Export Adjustment (Workaround)
- Why It Happens: If the export process itself is altering exposure, you can compensate beforehand.
- Fix It:
- Add an Adjustment Layer (Project Panel > New Item > Adjustment Layer) over your timeline.
- Apply the Lumetri Color effect to the layer.
- Reduce Exposure or adjust Highlights and Whites until the preview looks balanced.
- Export again and check the result.
6. Convert Footage Before Import (If Needed)
- Why It Happens: Some codecs (e.g., HEVC from iPhones) cause Premiere compatibility issues.
- Fix It: Use a tool like HandBrake or Shutter Encoder to convert your footage to a more compatible format (e.g., ProRes or H.264 in Rec. 709) before importing into Premiere.
Quick Checklist
- Match your sequence and export color spaces to your footage (Rec. 709 for SDR, Rec. 2100 HLG for HDR).
- Avoid default export presets without verifying color settings.
- Test exports on multiple devices/players to rule out display issues.
Hope it helps: